This chapter contains the following topic:
The Banks selection contains information about banks used for generating direct deposit ACH and Positive pay file data. It also contains information about where you locate these files.
This selection is relevant if you are using either direct deposit ACH or Positive pay in Accounts Payable or ACH Direct Deposit or positive pay in Payroll. Banks are needed when setting up vendors in A/P and employees in P/R. If you are not using direct deposit ACH or positive pay in A/P and PR there is no need to enter any banks.
There is a cash account associated with each bank.You must enter at least one Valid G/L account and Cash account before you start entering bank information.
ACH is an acronym for Automated Clearing House. See the Glossary for a definition of the key term ACH or Automated Clearing House.
Both positive pay and direct deposit ACH data are printed to a file as a part of the check printing process:
| • | A positive pay file for Accounts Payable and Payroll is generated and checks are also printed. Checks are the payment and are distributed normally. The positive pay file is sent to your bank which is used to identify the checks expected to be cleared at the bank. You may define a custom format based on what your bank requires. The format may be different for A/P vs. Payroll and may be different per bank account used. |
| • | Direct deposit ACH processing also saves data to a file that you send to your bank. However, instead of checks, remittances in A/P and mailers in Payroll are printed. The vendors and employees are paid by your bank based on the data in the ACH file.The format for an ACH file is standardized and not customizable. |
There are two types of direct deposit methods for Payroll as defined in Payroll Control information: Report only and Electronic payment. Setting up banks is only required for the Electronic payment method.
You will be entering two bank types. At least one company bank that processes the ACH and/or positive pay file with any number of receiving banks depending on the number of Vendor or Employee banks required.
The minimum and maximum number of banks required for positive pay and direct deposit ACH varies. This table illustrates the number of banks that may be utilized for Accounts Payable and Payroll.
|
Module |
Type |
Number of ACH Banks |
Number of Positive Pay Banks |
|
AP |
Company Bank |
1 per cash account |
1 per cash account |
|
AP |
Vendor |
1 |
N/A |
|
PR |
Company Bank |
1 per cash account |
1 per cash account |
|
PR |
Employee |
Up to 15 |
N/A |
All direct deposit ACH processing is contained within PBS except the actual transmission to the company processing bank. It requires that the company choose a processing bank that accepts the standard ACH (Automated Clearing House) format. The ACH file, required by the processing bank, is automatically generated when the Register is printed during the check run.
For more information on direct deposit ACH and positive pay processing see the Implement Positive Pay and Direct Deposit appendix in the Accounts Payable user documentation. For more information on direct deposit ACH and positive pay processing in Payroll, see the Implement Positive Pay and Direct Deposit appendix in the Payroll user documentation.
For an explanation of each field for each record in an ACH file, see the Direct Deposit ACH File Specifications appendix in the PBS Administration documentation.
A bank can be one of two types: ACH and Company /ACH. There is only one tab required for entering an ACH bank. Two tabs are required for entering a Company /ACH bank.
Select
Banks from the CTL menu.
Graphical Mode
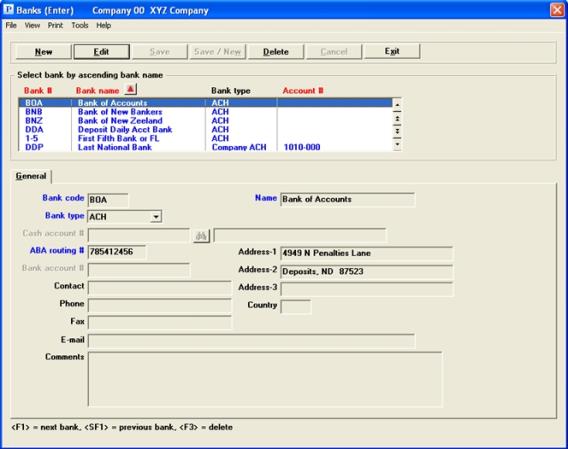
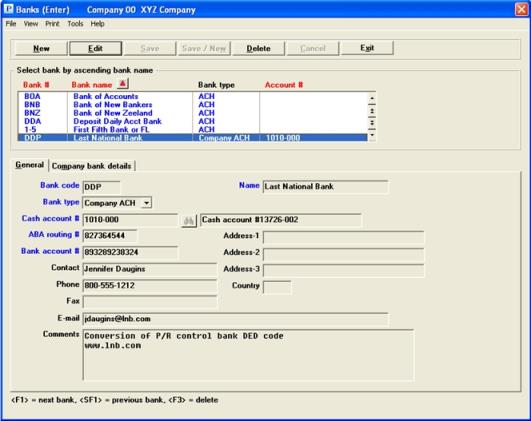
The following screen displays:

The list box displays up to 6 existing banks at a time. You may sort the list by bank #,bank name and account #, all in ascending or descending order. Click on the column name or the arrow to the right of the column name to change the sort or use the View options. Only column names in red may be sorted.
|
Note |
Only the Company ACH bank type entries have account numbers. Sorting by account number only displays Company ACH banks. See Bank type |
To find a bank via the list box, the focus must be on the box (the data displays as blue). To locate a bank, start typing the number, name or account number depending on which sort field is selected. You may also use the up/down arrows, Page up, Page down, Home and End keys to locate a bank. The <F1> and <SF1> keys function the same as the up/down arrow keys.
Banks that display in the list box are available for changes or deletion. The fields for the selected bank display in the lower part of the screen.
When a bank is found, you may select the <Enter> key or Edit button to start editing.
When you are adding or editing a bank you have the following button options:
| Button | Keyboard | Description |
|
New |
Alt+n |
Add a new bank |
|
Edit |
Alt+e |
Edit an existing bank |
|
Delete |
Alt+d |
Delete an existing bank. You may also use the <F3> key. See Cash Account Deletion |
|
Save |
Alt+s |
To save a record you added or edited |
|
Save/New |
Alt+w |
To save what you added or edited and start entering a new bank |
|
Cancel |
Alt+c |
To cancel adding or editing a bank |
|
Exit |
Alt+x |
To cancel adding or editing a bank. To exit to the menu. You may also use the <Esc> key |
Menu Selections
At the top left of the screen, a variety of menu selections are available. Most of these are the similar from screen to screen. If a menu selection is grayed out, you will not be able to access it. The selections that are unique to this screen are explained here:
Select Print to print a list of banks. See Printing Bank Lists
Character Mode
The following screen displays:
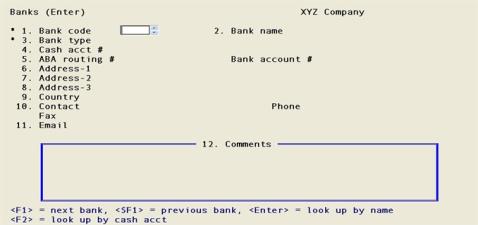
Enter the following information for the first tab (screen 1 in character):
This field can only be entered when adding a new bank.
Options
Enter a valid bank code number, or use one of the options:
|
<F1> |
For the next bank on file |
|
<SF1> |
For the previous bank |
|
blank |
In character mode you may lookup by bank name |
|
<F5> |
In character mode you may lookup by cash account number |
|
Format |
4 characters |
Enter a valid bank name.
Options
The options for lookup by the name field are only available in character mode. For graphical mode, see the Banks List Box. In character mode you may use one of the options:
|
<F1> |
For the next bank on file |
|
<SF1> |
For the previous bank |
|
blank |
Lookup by bank name |
|
Format |
23 characters - The size of this field is limited to 23 characters due to the restrictions of the ACH file standards. |
This field can only be entered when you are adding a new bank. Enter the bank type. There are 2 choices:
| Character | Graphical | Description |
|
A |
ACH |
This is a bank for either an employee or vendor |
|
C |
Company ACH |
This the bank used by your company. It may also be used by an employee or vendor |
An ACH bank indicates that it is either a vendor bank or an employee bank. This is also know as the receiving bank. See Receiving Bank.
A Company ACH bank is the processing bank. See Processing Bank.
It is possible that a vendor or employee may use the same bank as the company ACH processing bank. This also applies if positive pay is used.
|
Format |
Graphical: Drop down list. The default is ACH Character: One letter, either A or C |
|
Example |
Select ACH or type A |
This field cannot be entered if this is an ACH bank type. See Bank type
This cash account will be credited for the ACH amount.
When you enter a cash account during the process of printing checks, it identifies the bank record that you are using.
You may enter one cash account for one bank. They have a one to one relationship.
|
Format |
Your standard account number format, as defined in Company information |
|
Example |
Type 1010-000 |
This account is not on file - would you like to add it ?
If you entered an account number that is not one of the Valid G/L accounts, then you will get this message. Select Yes if you want to add the account to the Valid G/L accounts or select No to re-enter the account number.
|
Format |
Graphical: Yes/No question window Character: One letter, either Y or N |
|
Example |
Type N |
This message will only display if Check Reconciliation is installed.
If you select Yes, then the matching address and contact fields from the C/R Checking account will fill in the fields here.
Enter the ABA bank number. This is sometimes known as the bank routing number.
The bank ABA routing # is used in two areas:
| • | For the offset in the ACH process. When this is the case check the box (select Y) to the field ACH generate offset on the second screen. |
| • | For positive pay to the bank, as you must identify the company's ABA bank routing number on the positive pay form in order for checks to clear. |
Options
The first digit of an ABA routing number must be 0, 1, 2 or 3 and all digits should be numeric.
|
Format |
9 characters |
|
Example |
011122222 |
Bank routing number format: TTTTAAAAA where TTTT = routing transit and AAAAA = ABA number.
It must be 9 digits long, numeric and an expected numeric format. If not the expected format you will see the following message:
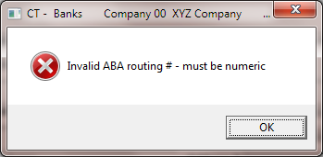
Regardless of this message you may continue with the number as entered or change it.
Changing the ABA Routing Number
If you change the ABA routing number a program validation is done against the Vendor and Employee Direct Deposit setup records to see if the Bank code is being used. If it is used a the following warning message displays to indicate the change will affect such records:
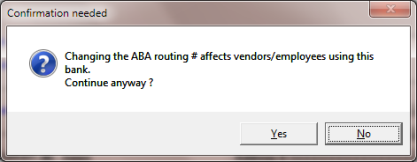
If you select yes to make the change another message displays to indicate that each Vendor and Employee using this bank will have the DDA Prenote reset. When this happens you will have to return to each Vendor and Employee bank record and make appropriate changes.
When saving the Bank record with the modified routing number the program updates the Prenote flag to "Y" on any Vendor and Employee Direct Deposit setup record using this bank. For Vendor records the Vendor change log is also updated.
If you do not wish to make the change select No to either question and the previous Bank routing # is restored. You may continue making other changes or cancel the editing.
This field cannot be entered if this is an ACH bank type. For ACH type banks enter the Bank account number for Vendors in A/P Vendors and for Payroll in Employees.
Enter your company’s bank account number. It is written to the A/P or P/R direct deposit ACH file.
|
Format |
17 characters |
|
Example |
999999999 |
Address-1
Address-2 and
Address-3
Three lines are provided for the bank address. All three are optional and are not required for ACH or positive pay processing. There are no rules about where the city and zip code go; you may wish to adopt your own standard about this.
|
Format |
30 characters at each field |
|
Example |
Type 9200 N Harlem Type Morton Grove, IL Type 60053 |
Enter the country code where the bank is located. This field is optional.
|
Format |
3 characters |
|
Example |
Press <Enter> |
Enter the name of the person to contact at this bank location.
| • | The contact is optional and may be left blank. |
| • | The contact may have a phone number or fax without the person’s name, and vice versa. |
|
Format |
25 characters at each field |
|
Example |
Type Audrey A. Smith for Contact |
Enter the contact’s phone number.
|
Format |
25 characters. Lower-case letters are preserved. |
|
Example |
Type 437-555-1246 |
Enter the bank’s fax number.
|
Format |
25 characters. Lower-case letters are preserved. |
|
Example |
Press <Enter> to leave the contact blank |
Enter the email address.
|
Format |
60 characters. Lower-case letters are preserved. |
|
Example |
Press <Enter> to leave it blank |
Enter any comments about the bank.
In character mode, this field uses Passport’s text editing function. Refer to the Using Notes section in chapter 4 of this documentation.
|
Format |
10 lines of 65 characters each |
|
Example |
Type Primary Bank |
Make any changes as needed.
If this is an ACH bank type, select the Save button to save the new ACH bank record or save any changes made to an existing record.
If this is a Company ACH bank type, you must also enter fields on the second tab.
Graphical Mode
The following screen displays:
Character Mode
The following screen displays:
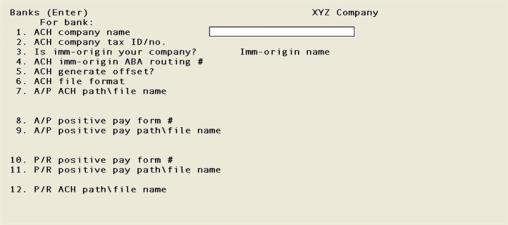
Enter the following information for screen 2:
Enter your company name.
If this field is left blank, then direct deposit ACH processing is not used for this company bank. You may set up fields 8 through 11 for positive pay for Accounts Payable and Payroll.
In most cases this field will contain your company’s Federal Tax ID number. However, contact a representative from your bank to determine what should go in this field.
The first position is either a blank, 1, 3 or 9. Following the first position enter your company’s Federal Tax ID number as the immediate origin, unless your bank forwards the ACH records to another bank or the Federal Reserve.
There are certain acceptable formats for this field and they include the following:
|
1NNNNNNNNN or (blank)NNNNNNNNN |
where N is Federal Tax ID for your company |
|
3NNNNNNNNN |
where N is the D&B D-U-N-S number |
|
9NNNNNNNNN |
where N is defined by the processing bank |
|
BTTTTAAAAC |
which contains the bank routing number where B is blank |
The contents of this field will be written to the ACH file.
|
Format |
Ten characters. The first character is blank, 1, 3 or 9. |
|
Example |
Enter 1999555333 |
If your bank requires a debit offset amount written to the ACH file, check this box (select Y), otherwise leave it unchecked (select N). This amount is auto-calculated.
|
Format |
Graphical: Check box, where checked is yes and unchecked is no. Default is unchecked Character; One letter, either Y or N |
|
Example |
Leave it unchecked or type N |
This field applies to both Accounts Payable and Payroll.
There are differences between Windows (DOS) and UNIX/Linux in how the end of a text line is terminated. A line in a DOS file will end with a carriage return and line feed (CR/LF). A line in a UNIX/Linux file will end with a line feed only (LF). For more information see the definition for Carriage return in appendix C.
This field determines if the ACH file has line feeds only (LF) or both carriage returns and line feeds (CR/LF) at the end of each line. The choices are different depending on the operating system where PBS is installed.
The choices on a Windows system are 0 = Operating system default - CR/LF DOS file or 1 = Line feed only UNIX/Linux file. In UNIX and Linux the choices are 0 = Operating system default - line feed only UNIX/Linux file and 1 = CR/LF DOS file.
If you are unsure which file format to use, ask someone from your bank the format they prefer. If you are still unsure, select the operating system default and send a test ACH file to your bank using that choice. A representative from the bank will let you know if you need to try the other option.
| Character | Graphical Windows | Description |
|
0 |
Operating system default CR/LF DOS file |
For the system default. For a system installed on Windows this is: CR/LF DOS format For a system install on UNIX/Linux: LF only in UNIX or Linux |
|
1 |
Line feed only UNIX/Linux |
For a system installed on Windows, the choice will display as: Line feed only UNIX/Linux file. On a UNIX or Linux installed system this will display as CR/LF DOS file. |
|
Format |
Select from the list above. |
|
Example |
Select <Enter> for the default |
Immediate origin refers to the entity that sends the ACH file to the final destination. If your bank is the final destination, the immediate origin is your company. If you send the ACH file to your bank and they route the file to another entity, like the Federal Reserve System central bank, then your bank is the immediate origin.
If the immediate origin is your company, check this box (select Y), otherwise leave it unchecked (select N).
If you are sending the file to your bank and then routed to a Federal Reserve Bank, then leave it unchecked (select N).
|
Format |
Graphical: Check box where checked is yes and unchecked is no Character: One letter, either Y or N |
|
Example |
Leave it unchecked or type N |
For an explanation of how the immediate origin settings effect the ACH file output, see the Use of Fields for Immediate Origin Options section of the Direct Deposit ACH File Specifications appendix in the PBS Administration documentation.
If your company is the immediate origin, then enter your company name. If not then enter the name of your bank.
|
Format |
10 characters |
|
Example |
Press <Enter> |
What you enter here gets written to the ACH header record. The information in this field ties to field 4.
or
ACH imm-origin ABA routing #
If you entered Y for the Is imm-origin your company field, then enter your company’s tax ID number. If you entered N for that field, then it is your bank’s routing number.
The first position is a blank, 1, 3 or 9. Following the first position enter your company’s Federal Tax ID number as the immediate origin, unless your bank forwards the ACH records to another bank or the Federal Reserve.
There are certain acceptable formats for this field and they include the following:
|
1NNNNNNNNN or (blank)NNNNNNNNN |
where N is Federal Tax ID for your company |
|
3NNNNNNNNN |
where N is the D&B D-U-N-S number |
|
9NNNNNNNNN |
where N is defined by the processing bank |
|
BTTTTAAAAC |
which contains the bank routing number where B is blank |
The contents of this field will be written to the ACH file which will be submitted to your bank.
|
Format |
Ten characters. The first character is blank, 1, 3 or 9. |
|
Example |
Enter 1999555333 |
A/P setup
You cannot enter this field if you do not have Accounts Payable and the Generate ACH field is not checked in the A/P Control information.
There are two files created during the direct deposit ACH process in Accounts Payable. There is the primary ACH file and the backup ACH file.
Enter the path and file name of the primary ACH file that will be submitted to your bank or use the option:
|
<F2> |
For APACH\ACHFIL This option will add the company number and the extension ‘.TXT’ to the end of the file. If your company is 00 then the file name becomes ACHFIL00B0001.TXT. |
The backup ACH files are also created, by default, in the same directory defined in this field however the backup name is auto-generated.
|
Note |
In Windows you may enter a path to another drive letter. For instance, you can enter a path such as the following. C:\APACH00\ACHFILAA.TXT In the above example, the files are stored locally. In thin client, you will be prompted to save the file to a file location on your local workstation. |
Each time an ACH file is generated, if the previous ACH file is still there, it will be overwritten. This only applies to the primary ACH file and not the backup files.
|
Format |
Seventy characters |
|
Example |
Enter APACH00\ACHFIL.TXT |
If you need more information, go to the A/P User documentation Implement Positive Pay and Direct Deposit Appendix in the section called ACH File Name, Path and Backup.
You may only enter this field if you have Accounts Payable and you checked the A/P Control information Generate positive pay field. Otherwise it cannot be entered.
Enter the name of the Accounts Payable positive pay form. Positive pay forms are entered under the A/P Master information menu selection of Positive pay forms.
|
Format |
5 characters |
|
Example |
AP-POS |
You may skip this field during initial entry, but you must create a positive pay form and fill in this field before you do a check run with A/P positive pay activated.
You must enter the Positive pay form # field before you can enter this field. If A/P positive pay is active, then you must enter this field before you do a check run.
Enter the path and file name of the primary ACH file that will be submitted to your bank or use the default option.
|
<F2> |
If field 8 contains a CSV form type, the default path and file name is APPOSPAY\APPOS00B.CSV. If it is a TXT form type then the default is APPOSPAY\APPOS00B.TXT. |
The backup ACH files are also created, by default, in the same directory defined in this field. The backup file name is auto-generated.
|
Note |
In Windows you may enter a path to another drive letter. For instance, you may enter a path such as the following: C:\APPOSPAY00\POS00.CSV In the above example, the files are stored locally. You must enter a path when using Thin client. |
Each time an ACH file is generated, if the previous ACH file is still there, it will be overwritten. This only applies to the primary ACH file and not the backup files.
|
Format |
Seventy characters |
|
Example |
Enter ACH\ACHFIL.TXT |
P/R setup
There are two files created during the direct deposit ACH process in Payroll. There is the primary ACH file and the backup ACH file.
Enter the path and file name of the primary ACH file that will be submitted to your bank or use the default option.
|
<F2> |
For PRACH\PRACH00B0001.TXT |
The backup ACH file is also created, by default, in the same directory defined in this field but the name of the backup file cannot be changed.
|
Note |
In Windows you may enter a path to another drive letter. For instance, you can enter a path such as the following. C:\PRACH00\PRACH00.TXT In the above example, the files are stored locally. In thin client, you will be prompted to save the file to a file location on your local workstation. |
Each time an ACH file is generated, if the previous primary ACH file is still there, it will be overwritten. This only applies to the primary ACH file but not the backup ACH files.
|
Format |
Seventy characters |
|
Example |
Enter PRACH00\ACHFIL.TXT |
If you need more information, go to the P/R User documentation appendix Implement Positive Pay and Direct Deposit section called ACH File Name, Path and Backup.
You may only enter this field if you have Payroll and you checked the P/R Control information Generate positive pay field. Otherwise it cannot be entered.
Enter the name of the Payroll positive pay form. Positive pay forms are entered under the P/R Master information menu selection of Positive pay forms.
|
Format |
5 characters |
|
Example |
Enter PR-POS |
You may skip this field during initial entry, but you must create a positive pay form and fill in this field before you do a check run with Payroll positive pay activated.
You must enter the payroll Positive pay form # field before you can enter this field. If Payroll positive pay is active, then you must enter this field before you do a check run.
Enter the path and file name of the primary positive pay file that will be submitted to your bank or use the default option.
|
<F2> |
If field 10 contains a CSV form type, the default path and file name is PRPOSPAY\PRPOS00B0001.CSV. If it is a TXT form type then the default is PRPOSPAY\PRPOS00B0001.TXT. |
A backup positive pay file is also created, by default, in the same directory defined in this field. Each time a positive pay file is generated the previous positive pay file is overwritten. However the backup positive pay files are retained.
|
Format |
Seventy characters |
|
Example |
Select <F2> for PRPOSPAY\PRPOS00B0001.CSV |
Select the Save button to save the new record or any changes to the record. See Banks Buttons for all the options.
Using character, select <Enter> to save the new bank record or save any changes made to an existing record.
Select the <Esc> key to not save the new record or all changes to the record.
This report will print a list of banks.
Select
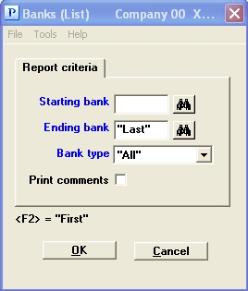
Banks from the CTL Reports menu. The following screen displays:
Graphical Mode
Character Mode
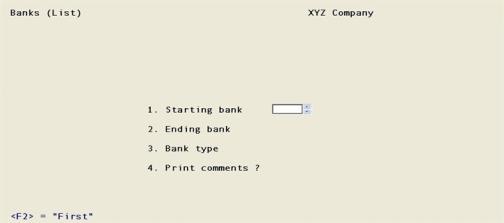
Enter the following information:
Options
Enter a valid bank number, or use the option:
|
<F2> |
For the “first” bank on file |
|
Format |
4 characters |
|
Example |
<F2> for the “first” bank |
Options
Enter a valid bank number, or use the option:
|
<F2> |
For the “last” bank on file |
|
Format |
4 characters |
|
Example |
<F2> for the “last” bank |
Enter the bank type. There are 3 choices:
| Character | Graphical | Description |
|
A |
ACH |
An ACH bank is a list of banks used by your employees or vendors |
|
C |
Company ACH |
The company ACH bank is your bank. It can also be used by one of your employees or vendors |
|
<F5> |
"All" |
For “All” bank types |
An ACH bank indicates that it is either a vendor bank or an employee bank.
It is possible that a vendor or employee may use the same bank as the company. So, a Company ACH bank can be the same location where a vendor or employee banks.
Indicate if you are going to print bank comments on the list.
| Character | Graphical | Description |
|
Y |
Checked |
Print comments |
|
N |
Unchecked |
Do not include comments |
Select a field number to change or select the <Enter> key to print the report.